Yesterday we reviewed how to remove a fish hook. Today we will piggy back off that theme, and because summer is coming, review how to remove a tick.
Aside from Lyme disease, ticks are capable of transmitting multiple diseases, including ehrlichiosis, babesiosis, Rocky Mountain spotted fever, tularemia, and tick paralysis. Early removal of the tick is thought to limit transmission of disease, so do it as soon as the little bugger is identified (bites are often painless and may go unnoticed).
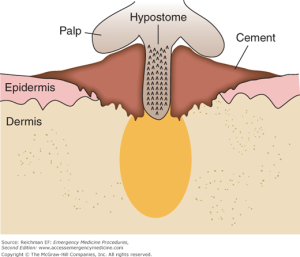
Ticks have special mouth parts that makes their removal difficult. After burying into the skin with their mouths, they attach via a rod-like hypostome, which has multiple sharp backward barbs that prevent them from being easily pulled out. Some even release a cement-like material to further secure their attachment! The longer a tick is attached, the harder it is to remove intact.
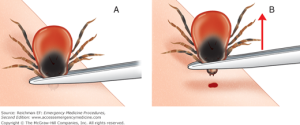
DO: Grab the tick with forceps or a mosquito hemostat at the head or mouthparts, or as close to the patient’s skin as possible. Apply firm upward pressure to remove with direct traction. Carefully examine the skin for any remaining portions (a common complication is separating the head from the body). If you see retained parts, gently grasp and remove them with forceps, or tease them out with a sterile needle tip. Otherwise, they can serve as a nidus for infection.
DON’T: Crush, puncture, squeeze, or tear the tick’s abdomen. Inadvertently crushing the tick may cause its stomach contents and saliva to enter the wound and increase risk of disease transmission.
Special thanks to RN Mo Reiche for the pearl idea.
Chapter 99. Tick Removal. In: Reichman EF. eds. Emergency Medicine Procedures, 2e New York, NY: McGraw-Hill; 2013. http://accessemergencymedicine.mhmedical.com/content.aspx?bookid=683§ionid=45343741. Accessed June 27, 2017.


