Central Line Week TR Pearl Series (all three pearls combined for this post)
by Ryan LeBuhn, PGY-3
Informed Consent
I once described the risks of a procedure so thoroughly that the patient no longer wanted the procedure, though avoiding the procedure put her in greater danger than doing it would have.
The next time I described the risks of a procedure, I also described the ways in which those risks would be minimized; this went over better.
Achieving the core objective of a procedure satisfies the loosest definition of “competence.” Achieving that objective with truly minimized risk to the patient is closer to the definition of competence that you deserve to strive for, as is abandoning that objective when the risk/benefit tips away from doing the procedure.
Earlier in the week I sent out some videos to teach you how to achieve the primary objective of placing a central line. For the “Central Line Week” Pearl series, we will break down the potential complications of the procedure and how to minimize each of them.
Sources: Roberts & Hedges’, Emcrit, PubMed, 2.5 years of residency.
Complications:
Arterial Puncture and Hematoma
Pneumothorax (subclavian and internal jugular approach)
Hemothorax (subclavian and internal jugular approach)
Vessel Injury
Air Embolism
Cardiac Dysrhythmia
Nerve Injury
Thrombosis
Catheter Misplacement
Infection (let’s start here, then go back to the top and work our way down)
Infection
Hospitals care about Central-Line-Associated Bloodstream Infections (CLABSIs) because Medicare won’t reimburse for costs associated with them. As a result, there is robust and detailed evidence out there describing “bundles” of best practices that, when adopted strictly, have huge effects on the rates of these.
The first one published in the United States was by a group from Johns Hopkins, and included:
Hand hygiene before catheter insertion (are you routinely doing this?)
Use of full barrier precautions (mask, cap, gown, sterile gloves, and sterile full body drape – if you’re opening a sterile bundle in addition to the central line kit to do the procedure, you are probably doing this)
Chlorhexidine skin preparation (best single antiseptic we have, and that is why this antiseptic specifically is included in all the central line kits; your backup if they have an allergy is povidone-iodine)
Avoidance of the femoral vein for inserting CVCs (sometimes relatively unavoidable for us)
Prompt removal of CVCs (not our problem)
This is why that “sterile bundle kit” (the one you need to open in addition to your central line kit) exists: it’s supposed to pack all of these ingredients together so that you can’t avoid doing this right. The only thing it doesn’t contain is a big sign that says “wash your hands, try not the fem.”
The above was published in 2006, and the sterile bundle recommendations have been studied and refined many times. Notable inclusions in the most recent checklist put out by the CDC:
For patients >18 yo, use a chlorhexidine-impregnated dressing (this is the Biopatch, and it is not supposed to be applied until the insertion site is hemostatic; it can soak up and sterilize tiny amounts of oozing blood later on)
Place a sterile gauze dressing or a sterile, transparent, semipermeable dressing over the insertion site (the semipermability is important to prevent skin breakdown; don’t stack dressings)
Scrub the access hub with friction immediately prior to each use with an appropriate antiseptic (chlorhexidine, povidone iodine, an iodophor, or 70% alcohol – *eyebrow raise towards all of us*)
Use only sterile devices to access catheters (alright, that’s enough for now)
Here is the full CDC sterile bundle recommendations (there are a lot more). The CDC seems to have a vendetta against femoral lines and an obsession with subclavian lines. This is probably due to an overestimation of the infection rate of femoral access and a narrow-sighted perspective that infection is the only procedural complication worth reducing (as opposed to the risk of pneumothorax or hemorrhage at a noncompressible site).
BLEEDING COMPLICATIONS, inspired mostly by this 2014 review article.
Arterial Puncture and Hematoma
More common prior to ultrasound guidance; still happens sometimes
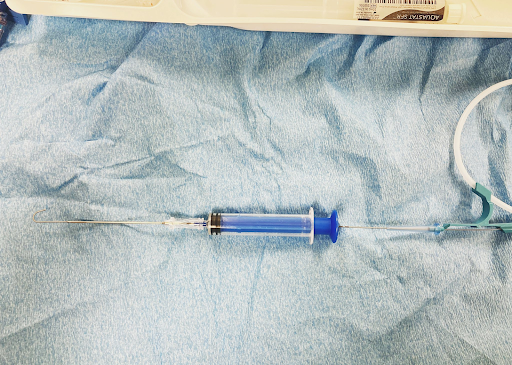
Not a big deal if the artery is punctured by the 18G (1.02 mm diameter) introducer needle (or the angiocath shown adjacent; more on this later)

A 1 mm arterial vessel injury should achieve hemostasis on its own or with minimal compression
It is a very big deal if the artery is punctured by the 8.5 Fr (2.8 mm diameter) tissue dilator

A 3 mm arterial vessel injury will bleed a lot without aggressive compression (this is also a large enough defect to cause aneurysm and/or dissection)
The femoral artery can be compressed to achieve hemostasis in the ED

The subclavian artery is hidden behind the clavicle and cannot be compressed

The carotid artery occupies an airway-adjacent space and cannot be compressed without compromising an unsecured airway
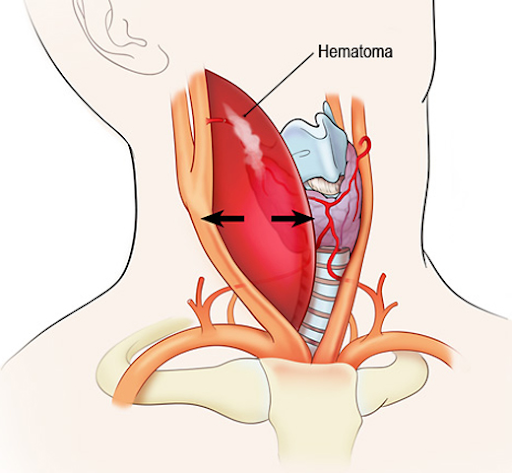
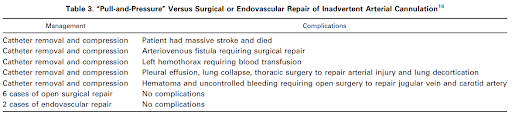
If your dilator ends up in an artery that you may not be able to achieve hemostasis for with compression, do not remove the dilator. This artery will need to be repaired with either open surgery or an endovascular device, and the dilater cannot come out until that repair is happening – call Vascular Surgery and/or Interventional Radiology.
This table describing the outcomes in 13 cases of accidental carotid or subclavian artery cannulation made an impression on me:
In the context of the above, it is worth being damned sure that your guidewire is cannulating only your target vein before advancing the tissue dilator. Here’s how:
Watch Your Needle Tip
Obsessively. Even under ultrasound guidance, ultrasound-credentialed physicians still accidentally cannulate the carotid. Watch. Your. Needle. Tip.
Blood Color and Pulsatility
It’s right most of the time. It’s wrong 0.8% of the time. When you look specifically at data subsets of arterial cannulations, it misidentifies somewhere between 19.6% and 16.7% of them as venous.
Manometry (safer than color and pulsatility)
Manometry caught all of the arterial cannulations missed on color/pulsatility inspection in the second study linked above. Here, watch David Reich do it.
Stabilize your Needle (if using the 18G introducer needle)
Practice this microskill to minimize the odds of your needle shifting into an artery during all of the steps between obtaining flash and passing the guidewire. Here’s Weingart teaching it.
Use the Angiocath (safer than using 18G introducer needle)
Or better yet, use the angiocath instead of the traditional introducer needle to get into the vein. The 20G needle beneath the angiocath included in the kit is less rigid and thus more difficult to control than the 18G introducer needle, but once you’ve gotten flash and advanced the soft angiocath into the vein, it cannot dislodge into an artery. That’s how Strayer does it.
Visualize the Wire in the Vein (do this every time before advancing the dilator)
The operating characteristics are probably really good but have not been well-studied. Not all placement locations allow adequate visualization. Through-and-through punctures of the vein into the artery can theoretically be missed.
That’s it for Arterial Puncture and Hematoma.
A word on Hemothorax
Puncturing a vessel where it communicates with the pleura makes a bad situation worse. To avoid doing this under ultrasound guidance: watch. your. needle. tip. To avoid doing this under landmark guidance: seek advice from someone who does that (note me)
A word on Vessel Injury
A vein injury can occur if the wire is forced through a backwalled dilator
See Weingart’s describing the Vascular Surgery technique of “racking” to avoid this
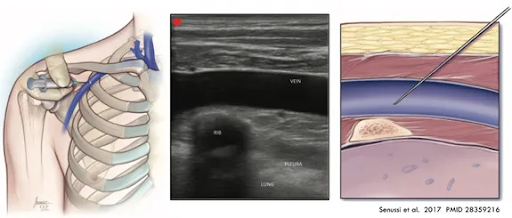
Pneumothorax
Only a problem with subclavian access or a very low approach to the internal jugular vein.
In subclavian access, keeping your angle shallow decreases the likelihood of going deep enough to enter the pleura. Two strategies to avoid pleural injury:
1. Keeping your needle horizontal, push the needle under the clavicle: Weingart’s approach.
2. Approach the vein where it runs over the first rib (as opposed to more laterally). The rib protects the underlying lung from your needle if you overshoot it. You can use landmarks to estimate this, or use ultrasound to visualize both the rib and the underlying pleura.
Air Embolism
The venous system is low pressure, and the negative pressure from inspiration can suck a bunch of air into the patient’s vein if there is a direct communication between the vessel and the outside.
Tilt the patient into Trendelenburg (head-down-enburg) for internal jugular and subclavian lines (neutral is fine for femoral lines) to raise the pressure in the vein you’re accessing.
Cover the hub of the finder needle or angiocath any time there isn’t a syringe or wire occluding it for you so air can’t get in.
Our kits have Raulerson syringes, through which you can thread the wire directly into the vessel without having to remove the syringe.
If you screw up and let a bunch of air into the vessel, put the patient in left lateral decubitus to keep the bubble in the RV, and if that doesn’t work, try to aspirate the air back out with the central line.


Cardiac Dysrhythmia
This happens when your wire tickles the right atrium; it never needs to go that deep (because your central line should never go that deep). Turning the monitor so you can see it during your procedure will tell you that you’re [click here].
A more elegant way to do this is to know exactly how far you plan to insert your central line and watch the markings on the guidewire to stop when you’ve reached that point. In our kits, the wire is marked with two bands at a depth of 20 cm and three bands at a depth of 32 cm. The needle is 6.35 cm long; if you’ve removed the syringe and are advancing the wire through the needle only, you’ve gone far enough once you see the two band marks on the wire (approx 14 cm); the three band mark is universally too deep if you’re only using the needle.


From the kit manual for when you’re using the Raulerson syringe:

Nerve Injury
The phrenic nerve and brachial plexus lie behind the internal jugular and subclavian veins, respectively. Watch your needle tip and don’t overshoot.

Thrombosis
Caused by endothelial irritation from the meds you give (or the catheter, if its tip is malpositioned up against a vessel wall). The whole point of using a central line is so you can infuse these meds in the largest vein in the body to minimize this risk, so check the chest xray to make sure that all of your internal jugular and subclavian lines are ending in the superior vena cava (your femoral lines are going to be in the IVC if you hub them; no need to check depth).

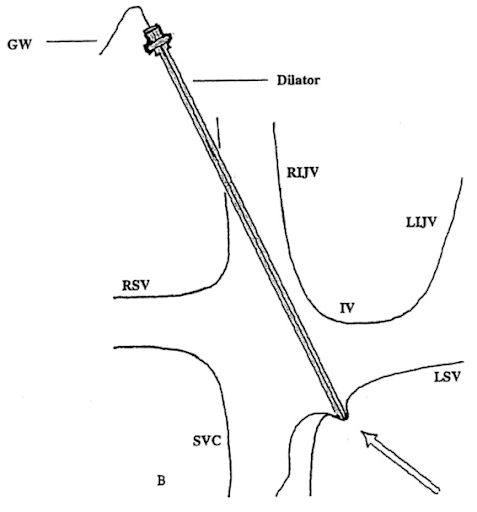
Catheter Misplacement
Get an xray. Learn how to interpret it.
BONUS COMPLICATION: Wire Embolization
Once the J-tip of the wire has passed through your needle into the vessel, it can shear off if you try to pull it back out against the sharp beveled needle tip. If you need to come out, remove the wire and needle together, and start over.
Great work, gang! You made it through central line week. For more, check out the Roberts and Hedges’ chapter on Central Lines. I cannot recommend this textbook highly enough; it is the definitive reference for procedures in our specialty. There is tremendous power in knowing the “textbook” approach to each procedure so that you can intelligently develop your own approach.
