If you’re like me, you probably hook your chest tube up to a Pleur-Evac, put it on the ground, then back away slowly. Who knows what goes on in that mysterious bubbling white box? Hopefully this will post shed some light.
[spacer height=”20px”]
Isn’t this just a container for stuff that comes out of the chest? Why does it look so complicated?
It’s complicated because the detection/collection of air and fluid require different setups. Most commercial models also allow you to hook the drainage system to wall suction, so you can quickly evacuate the pleural space. This requires its own setup. Because of the need to juggle air, fluid and suction, the most common commercial system includes 3 distinct chambers. If you were to simplify the device, or build one out of spare bottles and tubes, it might look like this:
[spacer height=”20px”]
[spacer height=”20px”]
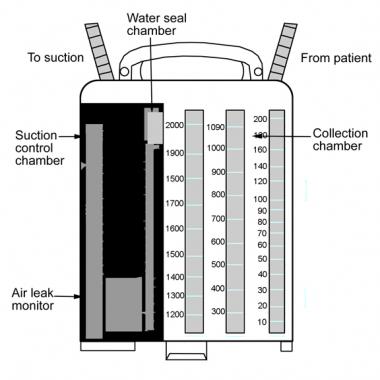
Bottle 1: Fluid Collection. This is a simple collection bottle that connects directly to your chest tube. Look here to see how much blood you’ve collected from your hemothorax, or fluid from your pleural effusion, or pus from your empyema.
[spacer height=”20px”]
Bottle 2: Water Seal. This is a more complicated setup that allows you to detect air from your pneumothorax (or from a leak due to equipment failure). To conceptualize this, imagine a straw submerged in a glass of water. If you blow air into the straw, bubbles will come out. Intermittent bubbles mean that there’s interrupted air flow, and continuous bubbles mean that there’s continuous air flow. However, if you try to suck on the straw, only water will come up and not air. This is another way of describing a one-way valve: air can escape the chest, but it can’t come back in.
[spacer height=”20px”]
Bottle 3: Suction Control. This is the fanciest bottle of all, and includes a manometer that allows you to deliver controlled suction through your chest tube. Fancy versions (like the Atrium Oasis 3600 stocked at Mount Sinai) also incorporate dials and bellows to allow you to turn the suction up and down. There are even fancier systems with dual collection chambers and all sorts of other snazziness.
[spacer height=”20px”]
The basic three-bottle chest drainage system looks like this in real life (here’s a more
detailed explanation):
[spacer height=”20px”]
Ok, I just put in a chest tube. How do I hook it up properly?
[spacer height=”20px”]
1. Let’s assume you’re using the Atrium Oasis or a similar 3-bottle system. First, squirt sterile saline or water into the suction port until the water seal chamber is filled to the 2 cm line.
[spacer height=”20px”]
2. Connect your chest tube to the drainage system’s “patient catheter.” Note that you need a stepped connector to firmly connect the two. If you really want to secure this connection, you can wrap some silk tape around it (the same kind that you used to dress your patient’s chest).
[spacer height=”20px”]
3. If you want suction, connect the tubing from your wall suction to the drainage system’s “suction port.” Once connected, turn on your wall suction. There’s a nifty “suction bellows” window that lets you know if your wall suction is strong enough, or if you need to crank it up more. The bellows should expand until they surpass the black arrow.
[spacer height=”20px”]
4. Pull out the kickstand from the bottom of the drainage system (yes, there is one!). Now place it at least 45 cm below your patient. This usually means on the floor or under the bed. It never means ON the bed.
[spacer height=”20px”]
How do I troubleshoot it?
If you’re in our Mount Sinai ED,
start here. …or call CT Surgery.
[spacer height=”20px”]
Thanks to Dr. Eric Bassan and Dr. Reuben Strayer for inspiring this pearl.

